 5.0 Out Of 250+ Reviews


 Financing Available


 (214) 227-2763

Table of Contents
- Why Identifying Hail Damage Matters for Your Roof
- How to Inspect a Roof for Hail Damage Safely from the Ground
- Common Signs of Hail Damage on Asphalt Shingles
- Hail Damage vs. Blistering and Normal Wear on Shingles
- Hail Damage Roof Inspection Checklist
- How Hail Size, Roof Age, and Shingle Type Affect Visible Damage
- Documenting Hail Damage for Your Insurance Claim
- Common Mistakes to Avoid During Your Inspection
- Frequently Asked Questions
Last Updated: October 13, 2026
Why Identifying Hail Damage Matters for Your Roof
Hail storms can damage your roof in minutes, and many homeowners don’t notice until water leaks inside, by which point the structural integrity of the home may already be compromised. Learning how to identify hail damage on asphalt shingles is essential for early detection.
How to identify hail damage on asphalt shingles is one of the most important skills a homeowner can develop. Early detection lets you file an insurance claim quickly and prevent costly water damage to your foundation, walls, and interior.
The difference between catching hail damage early and missing it can be thousands of dollars: a roof that looks fine from the ground may have dozens of impact marks that leak within months.
Hail damage often goes unnoticed until water begins seeping into your home. Early identification protects your property and strengthens your insurance claim.
How to Inspect a Roof for Hail Damage Safely from the Ground
You don’t need to climb onto your roof to identify potential hail damage. A ground-level inspection with binoculars and careful observation reveals most damage patterns while keeping you safe.
What You’ll Need Before Starting
Gather these items before you begin your inspection:
- Binoculars (10x magnification works well)
- Smartphone or camera with zoom capability
- Notebook to record observations
- Flashlight or headlamp for shaded areas
- Ladder (optional, for viewing gutters and downspouts)
- Clear weather (avoid inspecting during rain or high winds)
Step-by-Step Ground-Level Inspection Process
Step 1: Position yourself for a clear view. Stand back far enough to see the entire roof slope.
Step 4: Check gutters and downspouts. Hail knocks loose granules from shingles, so look for sandy buildup or small piles of dark material in your gutters.
Step 5: Inspect metal components. Look at any metal flashing around vents, chimneys, or skylights.
Step 6: Examine the ground below. Granules on the ground near downspout outlets indicate hail has struck your roof.
Use your smartphone’s camera zoom instead of climbing a ladder. Modern phone cameras capture enough detail to show hail impact marks from the ground. This method is safer and often reveals damage more clearly than being on the roof.
Common Signs of Hail Damage on Asphalt Shingles
The visible signs of hail damage on asphalt shingles follow predictable patterns. Knowing what to look for helps you distinguish storm damage from normal wear and aging.
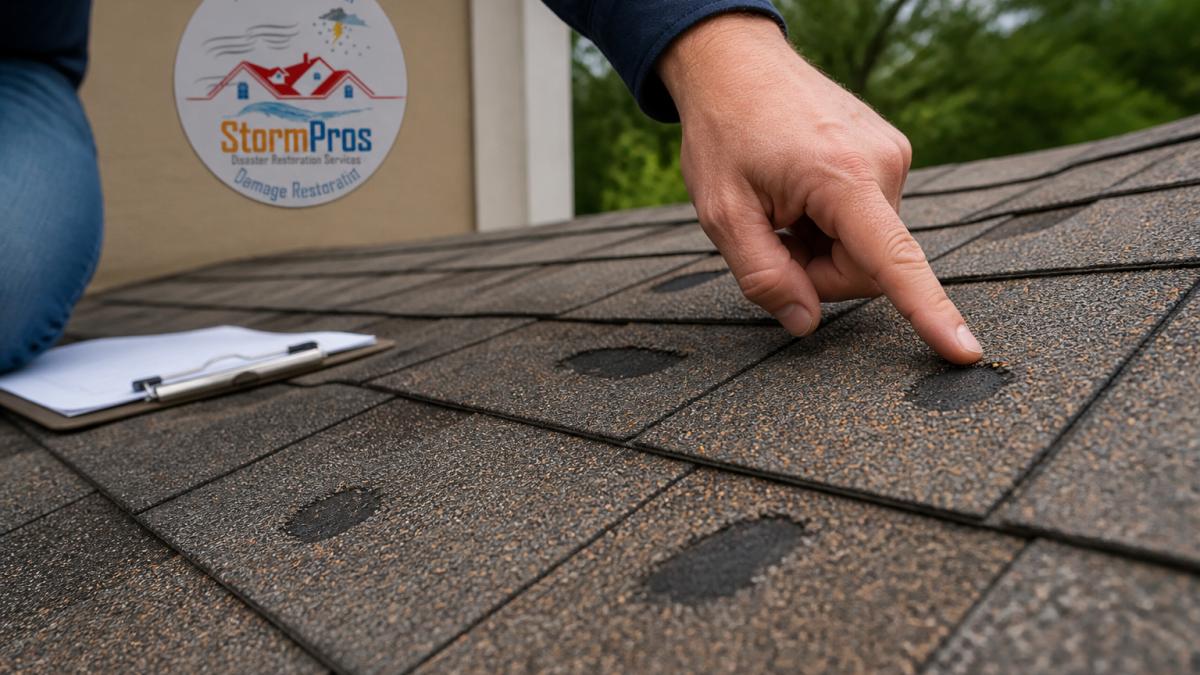
Dark Bruises and Impact Marks
Hail creates dark bruises on asphalt shingles that look like hammer strikes, circular or slightly oval depressions darker than the surrounding shingle, caused by the exposed asphalt mat beneath the granule layer.
Dark spots from hail damage typically appear in a random distribution pattern across your roof. This randomness is key. Normal wear happens in predictable locations (south-facing slopes, high-traffic areas), but hail strikes everywhere the storm passes.
Look closely: edges may be slightly raised or the center depressed, and some marks show a “halo” effect where surrounding granules are raised or displaced.
Granule Loss and Exposed Shingle Mat
Granules are the colored coating that protects asphalt shingles from UV damage. Hail can dislodge them, leaving the asphalt mat exposed.
You’ll notice granule loss as:
- Bald spots on shingles where granules are completely missing
- A lighter colored area showing the gray or tan asphalt mat underneath
- Sandy material accumulating in gutters and downspouts
- Granule buildup at ground level near downspout outlets
Fresh granule loss looks different from aging: new damage shows sharp edges where granules were knocked off, while aged shingles wear gradually rather than developing distinct bare spots.
Cracks, Fractures, and Punctures
Severe hail can crack or puncture shingles entirely, structural damage that will lead to leaks.
Look for:
- Visible cracks running across the shingle surface
- Radial damage patterns (cracks radiating outward from a central impact point)
- Holes or punctures in the shingle
- Tears in the shingle material
These require immediate repair; even if water isn’t leaking now, cracks and punctures let moisture in within months.
Damage Beyond Shingles: Gutters, Vents, and Flashing
Hail doesn’t only damage shingles. Check other roof components for dents and damage.
Gutters and downspouts: Hail leaves obvious dents in aluminum or steel gutters. Multiple dents confirm hail activity.
Metal flashing: Soft metals around vents, chimneys, and skylights dent easily; dents in flashing indicate hail strong enough to damage your entire roof.
Vents and penetrations: Plastic or rubber roof vents can crack from hail impact. Look for splits or damage to vent covers.
Damage to multiple roof components strengthens your insurance claim by showing the hail was severe enough to affect various materials.
If you find cracks, punctures, or holes in your shingles, contact a professional immediately. These damage types will lead to water leaks within weeks or months, causing interior damage that costs far more to repair than the roof itself.
Hail Damage vs. Blistering and Normal Wear on Shingles
Not every mark on your roof is hail damage. Blistering, aging, and normal wear create similar-looking damage that insurance won’t cover, so distinguishing them is crucial for a successful claim.
Distinguishing Hail Bruises from Blistering
Blistering occurs when moisture trapped under the granule coating creates a bubble that pops, leaving a bare spot. Blisters resemble hail bruises at first glance but have distinct characteristics.
Hail bruises appear in random patterns across your roof. Blistering typically appears in clusters or along specific roof sections where moisture accumulates.
Hail damage appears suddenly after a storm; blistering develops over months or years. If your roof was clean before the storm and marked after, it’s almost certainly hail damage.
Pattern matters too: hail marks look like thrown rocks, while blisters follow moisture patterns and appear where ventilation is poor.
Age-Related Damage vs. Storm Impact
Aging shingles lose granules gradually, creating uniform wear across the roof, while hail damage creates localized impact marks in a random pattern.
Old shingles show:
- Uniform granule loss across wide areas
- Fading and discoloration from UV exposure
- Curling edges on the shingle tabs
- Moss or algae growth in damp areas
Fresh hail damage shows:
- Concentrated dark bruises or bare spots
- Damage appearing after a specific storm event
- Random distribution with undamaged shingles nearby
- Sharp edges on damaged areas
Timeline matters: general wear on a 15-year-old roof is aging, but sudden damage on a 3-year-old roof after a hail storm is storm impact.
Hail Damage Roof Inspection Checklist
Use this checklist during your ground-level inspection to document potential hail damage systematically.
| Inspection Point | What to Look For | Found? |
|---|---|---|
| Shingle surface | Dark bruises or impact marks | Yes / No |
| Granule loss | Bare asphalt mat or sandy buildup | Yes / No |
| Cracks and fractures | Visible breaks in shingle material | Yes / No |
| Random pattern | Damage scattered across roof slope | Yes / No |
| Gutters | Dents in metal or granule accumulation | Yes / No |
| Downspouts | Granule piles at outlet | Yes / No |
| Metal flashing | Dents around vents and chimneys | Yes / No |
| Roof vents | Cracks or damage to covers | Yes / No |
| Multiple components | Damage to shingles AND metal | Yes / No |
| Storm timing | Damage appeared after recent hail | Yes / No |
How Hail Size, Roof Age, and Shingle Type Affect Visible Damage
Not all hail creates the same damage. Hailstone size, roof age, and shingle type all influence what you’ll see.
Hail size determines damage severity. Small hail (pea-sized) might not create visible marks on quality shingles. Quarter-sized hail creates obvious bruises and granule loss.
Roof age affects visibility.
Shingle type influences appearance.
Storm direction affects patterns. Hail falls at an angle, so south- and west-facing slopes often show more damage than north-facing ones, depending on wind direction.
Understanding these factors helps you explain damage patterns to your adjuster and why some roof areas show damage while others don’t.
Documenting Hail Damage for Your Insurance Claim
Proper documentation is essential for a successful claim, your photos and notes become the evidence supporting your claim amount.
Photo Documentation Checklist
Take photos that show:
- Wide shots of the entire roof slope affected by hail
- Close-up photos of individual impact marks
- Photos showing the random distribution of damage
- Comparison photos of damaged and undamaged sections side-by-side
- Photos of gutters with granule buildup
- Photos of dents in metal components
- Photos of the storm date on a weather report (to prove timing)
Organize photos chronologically, date each one, and use your smartphone’s location feature to tag them with your address.
What to Do After Identifying Possible Damage
Step 1: Document immediately. Photograph and note damage while it’s fresh; weather and further storms can obscure or worsen it.
Step 2: Contact your insurance company. File a claim within the timeframe specified in your policy (usually 30 days). Provide your photos and documentation.
Step 3: Schedule a professional inspection. Your insurer will send an adjuster, but a professional contractor assessment strengthens your claim.
Step 5: Keep all documentation. Save receipts, photos, inspection reports, and insurer correspondence in case you need to appeal a claim decision.
Most policies require claims within 30 days of the damage, so don’t wait weeks to contact your insurer.
Professional contractors like StormPros can help you navigate the entire claim process. We document damage thoroughly, communicate directly with adjusters, and ensure you receive fair compensation for repairs. This coordination simplifies the process.
Common Mistakes to Avoid During Your Inspection
Knowing what NOT to do prevents costly errors during your inspection.
Mistake 3: Only looking at shingles. Hail damages gutters, flashing, and vents too, so inspect all roof components.
Mistake 5: Not taking detailed photos. Vague photos don’t support your claim; clear close-ups of the damage are essential.
Mistake 6: Filing a claim without professional documentation. Adjusters often underestimate damage.
Mistake 8: Making repairs before filing a claim. Document damage first, then file; repairs completed beforehand might not be covered.
Identifying hail damage on asphalt shingles requires knowing what to look for and documenting what you find.
Frequently Asked Questions
What does hail damage look like on an asphalt shingle roof?
Hail damage on asphalt shingles appears as dark bruises or circular impact marks, often with granule loss exposing the underlying mat. You may see cracks, punctures, or a random pattern of damage rather than uniform wear. Bruises can be subtle, appearing as soft depressions without breaks in the shingle surface. Granules may collect in gutters or appear loose on the shingle surface. Nearby roof components like gutters, vents, and flashing often show dents or damage too.
How can you tell hail damage from normal wear on asphalt shingles?
Hail damage appears randomly distributed across your roof, while normal wear is usually uniform and concentrated in areas exposed to sun and weather. Hail impacts create sharp-edged bruises or cracks with defined boundaries, whereas aging causes gradual curling, splitting, and color fading. Blistering from manufacturing defects or heat is smooth and rounded, not dented. If damage is recent and follows a storm, and you see matching dents on metal components like gutters and vents, hail is the likely cause. Age-related damage progresses slowly over years, not suddenly after a storm event.
Can you inspect a roof for hail damage from the ground?
Yes, a thorough ground-level inspection is possible using binoculars, a camera with zoom, or a drone. Look at your roof from multiple angles and distances to spot bruises, granule loss, and impact marks on visible shingles. Check gutters and downspouts for granule buildup and dents. Inspect vents, flashing, and other metal components for dents that confirm hail impact. Ground-level inspection is safer than climbing and sufficient for identifying damage that warrants professional assessment. A professional can then confirm findings and check areas not visible from the ground.
What should you do after finding possible hail damage on your roof?
Document all damage with dated photos and notes about the storm. Contact your insurance company promptly to report the damage and file a claim. Provide your documentation and timeline. Your insurer will send an adjuster to assess the damage and determine coverage. Do not make permanent repairs before the adjuster inspects unless there is an active leak causing immediate water damage. A professional contractor experienced with insurance claims can help you navigate the process, ensure nothing is missed, and advocate for fair coverage. Contact a local contractor for a professional assessment if you are unsure about the extent of damage.


