 5.0 Out Of 250+ Reviews


 Financing Available


 (214) 227-2763

Table of Contents
- Why Inspecting Siding After a Storm Matters
- What You’ll Need Before You Start
- Step 1: Walk the Perimeter and Document Initial Observations
- Step 2: Identify Signs of Hail Damage on Siding
- Step 3: Check for Wind Damage and Loose Materials
- Step 4: Inspect for Moisture Intrusion and Water Damage
- How to Document Storm Damage for Insurance
- When to Call a Siding Contractor After a Storm
- Frequently Asked Questions
Last Updated: September 24, 2026
Why Inspecting Siding After a Storm Matters
Storm damage doesn’t always announce itself loudly. A tree falls on your roof and you call immediately. But siding damage? It whispers. Learning how to inspect siding after a storm helps catch small cracks, loose panels, and moisture intrusion before they compromise your home’s structural integrity and your insurance claim window closes.
How to inspect siding after a storm is one of the most important skills a homeowner can develop after severe weather. What you find in the first 48 hours determines whether you catch damage early, document it properly for insurance, and prevent secondary damage like rot and water intrusion. At StormPros, we’ve helped homeowners navigate this process.
The stakes are real. Undetected siding damage leads to water seeping behind panels, which rots the underlayment and sheathing. That damage compounds. What started as a $2,000 repair becomes a $10,000 structural fix. Insurance adjusters move fast, they visit, assess, and move on. If you haven’t documented the damage yourself by then, you’re relying entirely on their evaluation.
This guide walks you through a methodical siding inspection that catches what matters and creates the documentation you need for your claim.
Start your inspection within 48 hours of the storm. Insurance adjusters move quickly, and the sooner you document damage, the stronger your claim position.
What You’ll Need Before You Start
Before you climb a ladder or grab a flashlight, gather the right tools. You’re not conducting a professional engineering assessment, you’re doing a thorough visual inspection that protects your interests.
Essential tools for a siding inspection:
- Flashlight or headlamp (dark spaces hide damage)
- Binoculars (see high panels without climbing)
- Ladder (sturdy, 20+ feet for two-story homes)
- Camera or smartphone (document everything)
- Notepad and pen (write observations in real time)
- Work gloves (protect hands from sharp edges)
- Measuring tape (record damage dimensions)
Safety first. Don’t climb a ladder if the ground is wet or unstable. Don’t inspect during rain or high winds. If your roof is damaged or the structure feels unsafe, stop and call a professional immediately. A thorough inspection is worthless if you get hurt.
What to wear: Long pants, closed-toe shoes, and a long-sleeve shirt. Siding panels have sharp edges, and storm debris scattered on your property can cut skin easily.
Never inspect siding while standing on a wet roof or unstable ground. If the structure feels compromised, stop and call a contractor. Your safety matters more than documentation.
Step 1: Walk the Perimeter and Document Initial Observations
Start with a full perimeter walk before climbing anything. This gives you context and helps you identify the storm’s direction and impact pattern.
What to do:
- Stand back from your home (15-20 feet away) and look at each wall section
- Note which sides took the most visible damage
- Check for obviously missing panels, large dents, or seam gaps
- Look at your roof and gutters, they show the storm’s force
- Take wide-angle photos of each wall from this distance
What you’re looking for:
- Missing or displaced siding panels
- Large cracks or fractures
- Obvious seam gaps where panels no longer align
- Debris impact marks or gouges
- Water stains or discoloration (suggests water intrusion)
- Pieces of siding or trim on the ground
Write down which walls show the most damage. If the north side of your home is destroyed but the south side is fine, that tells you the storm came from the north.
Step 2: Identify Signs of Hail Damage on Siding
Hail damage on siding looks different than wind or impact damage. Hail leaves distinct dents, dimples, and punctures that spread across large areas. The pattern matters, random scattered dents across multiple panels prove hail, not isolated impacts.
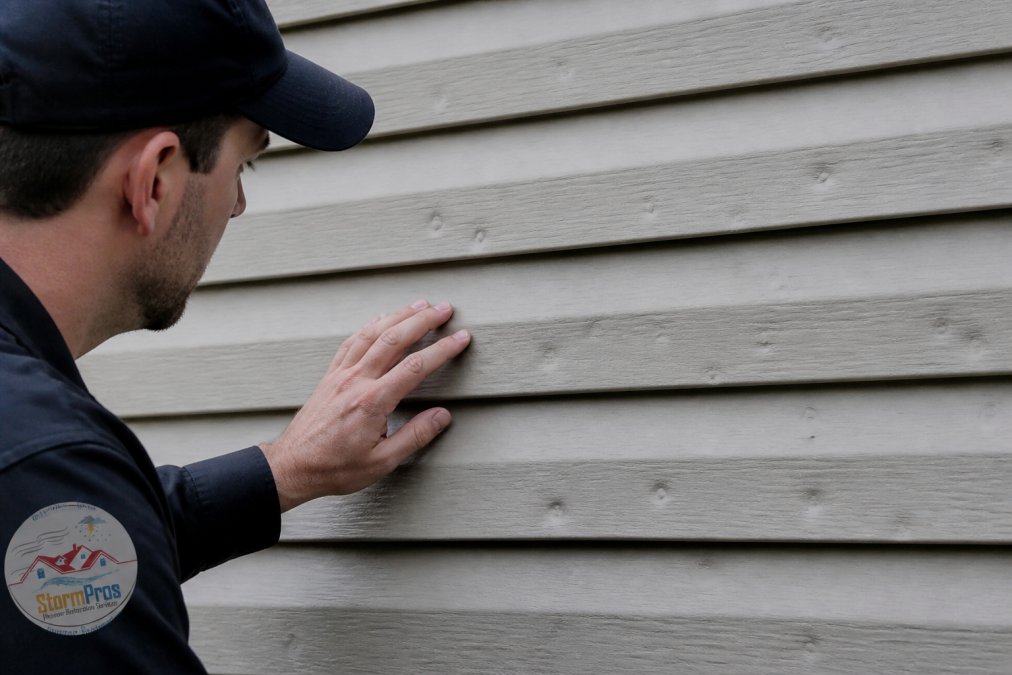
What hail damage looks like:
- Small circular dents (quarter-size to golf-ball-size)
- Dimples that don’t crack the panel (vinyl compresses rather than breaks)
- Damage scattered across multiple panels, not concentrated in one spot
- Shiny spots where the finish is scraped away
- Fractured or cracked panels with impact points
How to inspect for hail:
- Move close to panels and run your hand over the surface
- Feel for dents and dimples that break the smooth plane
- Look for shiny spots where protective coating is damaged
- Check panels at different heights, hail damage is usually consistent vertically
- Photograph each dent clearly, with a measuring tape or coin for scale
Use a coin or measuring tape in your photos to show hail dent size. This gives adjusters scale and makes damage harder to dispute.
Step 3: Check for Wind Damage and Loose Materials
Wind damage looks different than hail. Wind tears, lifts, and displaces panels. It pulls fasteners loose and rips seams apart. Wind damage is often more dramatic, entire sections missing or hanging, but it’s also easier to document.
Signs of wind damage:
- Panels lifted or pulled away from the wall
- Missing siding panels or trim
- Fasteners visibly loose or missing
- Seams that have separated or gapped
- Panels warped or buckled
- Trim and flashing torn or hanging
- Clicking or rattling sounds when you touch panels
How to check for wind damage:
- Walk the perimeter and look for visibly displaced panels
- Gently push on panels to see if they move or flex excessively
- Check all seams, they should be tight, not gapped
- Look at the bottom edge of each panel for gaps or separation
- Check around windows and doors where wind pressure concentrates
Step 4: Inspect for Moisture Intrusion and Water Damage
This is where storm damage becomes expensive. Water intrusion behind siding panels leads to rot, mold, and structural damage. Catching it early prevents secondary damage from compounding.
Signs of water intrusion:
- Water stains or discoloration on panels
- Soft or spongy areas (indicates rot in sheathing)
- Mold or mildew growth
- Peeling paint or finish
- Gaps or seam separations where water can enter
- Rust stains (from fasteners or metal flashing)
- Visible moisture or dampness
How to inspect for moisture damage:
- Look for discoloration or staining on panel surfaces
- Press gently on panels to feel for soft spots
- Check seams and gaps for moisture or water trails
- Look at the foundation line for water stains or damage
- Check around windows and doors, water collects there
- Inspect corners and edges where panels overlap
Soft, spongy siding indicates rot in the sheathing behind it. This is secondary damage that compounds over time. Document it and call a professional immediately, your insurance may cover both the siding and the underlying damage.
How to Document Storm Damage for Insurance
Documentation is where most homeowners fail. You find damage, but you don’t record it in a way that strengthens your claim. Insurance adjusters see hundreds of claims, yours needs to be clear, thorough, and hard to dispute.
Create a damage inventory:
- List each damaged panel or area
- Record the location (north wall, second floor, near window)
- Describe the damage type (hail dent, wind damage, water intrusion)
- Measure damage dimensions (width, height, depth)
- Take multiple photos from different angles
Photo documentation checklist:
- Wide shots showing overall damage pattern
- Close-ups showing specific damage details
- Photos with measuring tape or coin for scale
- Photos showing damage location relative to landmarks (window, corner, roof line)
- Photos of multiple damaged areas to show pattern
- Video of loose panels or rattling components
Write detailed notes:
- Date and time of inspection
- Weather conditions during the storm
- Direction the storm came from
- Specific damage observations
- Measurements and locations
- Any secondary damage (water intrusion, rot)
Your documentation is your evidence. Detailed photos, measurements, and notes turn vague damage claims into specific, defensible ones that adjusters can’t easily dispute.
When to Call a Siding Contractor After a Storm
You’ve inspected your siding. You’ve found damage. Now you need to decide: can this wait, or does it need immediate professional attention?
Call a contractor immediately if:
- You find soft or spongy panels (rot in sheathing)
- Large sections of siding are missing
- Seams are widely separated and water can enter freely
- You see signs of active water intrusion or moisture inside walls
- Panels are warped or buckled severely
- Your roof is also damaged (compound damage requires coordinated repair)
You can wait a few days if:
- Damage is limited to surface dents and minor cracks
- Seams are tight and no water is entering
- Only a few panels are affected
- The damage is cosmetic rather than structural
Frequently Asked Questions
How do I know if my siding has hail damage?
Hail damage on siding typically appears as dents, dimples, or small punctures across the panels. Look for circular or irregular indentations that break the surface. Vinyl siding may show cracking around impact sites, while other materials may display chipped finishes or fractures. Damage often clusters in one area rather than spreading evenly across the wall. Compare suspect areas to undamaged sections to spot the difference clearly.
Should I hire a professional for a post-storm siding inspection?
A professional inspection is recommended if you notice significant damage, suspect water intrusion, or need documentation for an insurance claim. Contractors can identify hidden damage like compromised underlayment and weather barrier issues that homeowners often miss. If your siding appears largely intact but you want thorough assessment, a professional can provide the detailed documentation required by insurers and ensure no structural issues develop later.
How do I document siding damage for an insurance claim?
Take clear photos and videos from multiple angles showing damage on all sides of your home. Include close-ups of specific dents, cracks, or gaps and wide shots showing the overall extent. Note the date and time of the storm. Create a written list describing each damaged area, including location (north wall, near window) and damage type. Store all documentation in one folder. Contact your insurance company promptly and provide this evidence to support your claim.
Can small cracks in siding lead to structural water damage?
Yes. Even small cracks allow water to penetrate behind the siding panels into the sheathing and underlayment. Over time, this moisture causes rot, mold growth, and structural deterioration. Water can also seep into wall cavities, affecting insulation and interior walls. Address cracks promptly, especially after a storm when weather barrier integrity is compromised. Early repair prevents expensive water damage that may not become visible until months later.


