 5.0 Out Of 250+ Reviews


 Financing Available


 (214) 227-2763

Table of Contents
- Storm Damage Repair Process Explained: What Happens After the Storm
- Emergency Response and Property Stabilization
- The Storm Damage Insurance Claim Process
- Documenting Property Damage for Insurance
- How Long Does Storm Damage Repair Take?
- DIY vs. Professional Thresholds
- Post-Repair Maintenance Checklist
- Conclusion: Choosing the Right Storm Damage Repair Partner
- Frequently Asked Questions
Last Updated: September 18, 2026
Storm Damage Repair Process Explained: What Happens After the Storm
Storm damage repair is the sequence of emergency stabilization, damage assessment, insurance documentation, and reconstruction that returns a property to its pre-storm condition. It begins within hours of the storm and runs for weeks or months depending on severity. This guide from StormPros walks through every stage.
Emergency Response and Property Stabilization
Emergency response and property stabilization is the first phase of storm damage repair: stop water intrusion, secure openings, and make the structure safe before permanent repairs.
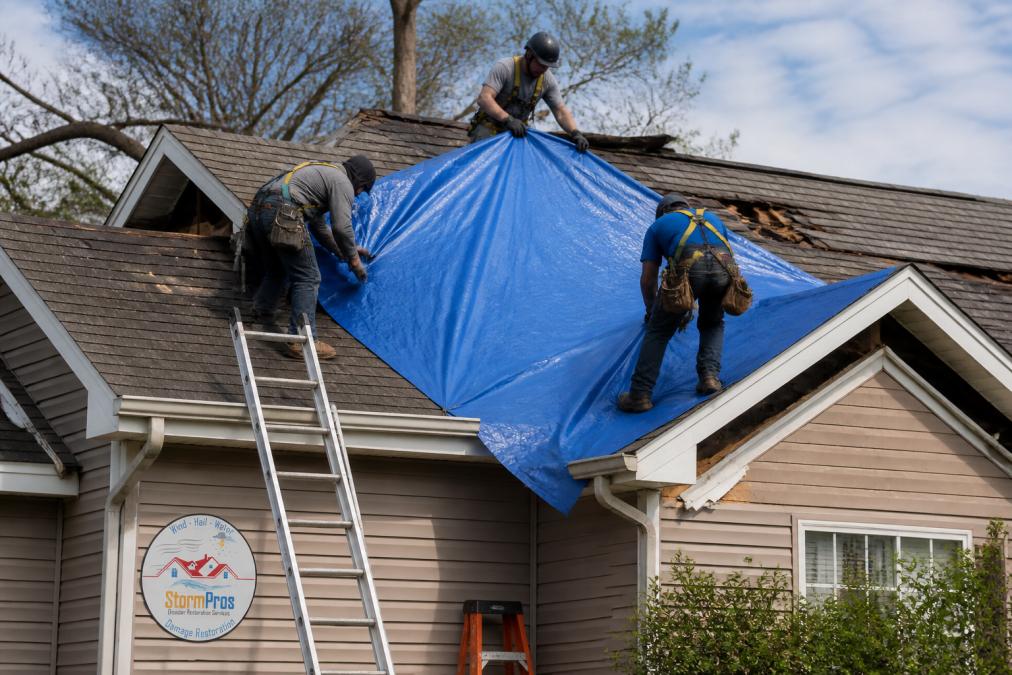
Emergency Tarping and Board-Up Services
Emergency tarping covers damaged roof sections with heavy-duty tarps to block rain and debris; board-up services secure broken windows and doors the same way. Both are temporary, but a single unprotected opening lets water into wall cavities and insulation, turning a roof repair into a full interior reconstruction.
The Storm Damage Insurance Claim Process
The storm damage insurance claim process is the sequence of filing a claim, meeting with an adjuster, agreeing on a scope of loss, and negotiating a settlement. It runs parallel to the repair work and often determines how much you pay out of pocket, the claim, not the hammering, is where homeowners usually lose money.
Filing the Claim: The First 48 Hours
Report the loss to your insurer as soon as it is safe. Most policies require prompt notice, and delays give an adjuster a reason to question whether the damage is storm-related. Have your policy number, the storm’s date and approximate time, and a short damage description ready.
- What is my claim number?
- Is my policy subject to a separate wind or hail deductible, and is it a flat dollar amount or a percentage of my dwelling coverage?
- What is the deadline for submitting my proof of loss and supporting documentation?
Working With Insurance Adjusters
The adjuster assesses damage and estimates repair cost for the insurer. Their estimate is a starting point, not a final number, adjuster estimates frequently miss hidden damage like water seepage behind siding, saturated insulation, rot under shingles, or foundation cracks that only show up after the ground dries.
Two practical moves make this stage easier:
- Be present for the adjuster’s inspection if you can, and point out every area you documented.
- Ask your contractor to prepare a line-item scope in the same format the adjuster uses, so the two documents can be compared directly.
FEMA guidance on filing flood and storm damage claims
Insurance Claim Documentation Strategy
Thorough documentation is the single biggest factor in a fair settlement, and the step most homeowners rush. Build the record before any repair begins, in a form an adjuster can use.
- Exterior: roof, siding, gutters, downspouts, windows, doors, fences, outbuildings
- Interior: ceilings, walls, floors, trim, attic insulation, crawlspace
- Systems: electrical panels, HVAC equipment, water heater, plumbing visible in walls
- Personal property: furniture, electronics, appliances, clothing, tools
- Receipts for any emergency tarping, board-up, water extraction, or lodging
- Written notes on when each item of damage was discovered and by whom
Upload your photos and inventory to cloud storage the same day you take them. Storm-damaged phones get dropped, and a paper folder gets rained on. A dated cloud folder is the version of your evidence that survives.
Financial Planning for Deductibles
Your deductible is what you pay before insurance covers the rest. Storm claims often carry a separate wind or hail deductible calculated as a percentage of your home’s insured value rather than a flat dollar amount. Check your policy declaration page to confirm which applies.
- Deductible. Due to the contractor, generally at or near completion, depending on your contract.
- Out-of-pocket upgrades or code items. If your jurisdiction requires a code upgrade during reconstruction, your policy may cover some or none of it. Ask your adjuster in writing.
- Temporary costs. Lodging, meals, and storage may be reimbursable under loss-of-use coverage. Keep every receipt and submit them as they occur, not in one pile at the end.
A common mistake is signing a repair contract before the claim scope is settled. If the final insurance payout is lower than the contract price, you are on the hook for the difference. Agree on the scope first, then sign. Also be cautious of any contractor who offers to “handle everything” with your insurer and asks you to sign over your claim rights, that arrangement limits your control over the settlement.
When the Claim Falls Short
If the settlement does not cover the documented scope, request a re-inspection with your contractor present, then submit a supplement with line-item documentation. If the dispute continues, most policies include an appraisal clause, and many states offer a department of insurance complaint process. Ask your insurer for the specific dispute-resolution language before you escalate.
Documenting Property Damage for Insurance
Documenting property damage for insurance means creating a dated, detailed record of everything the storm damaged before repairs begin.
Insurance Claim Documentation Strategy
Start wide, then get close: photograph each affected area from a distance for context, then move in for detail shots of cracks, missing shingles, and water stains. Date every photo and note the location.
- Exterior: roof, siding, gutters, windows, fences
- Interior: ceilings, walls, floors, attic insulation
- Personal property: furniture, electronics, appliances
- Receipts for any emergency tarping or board-up
- Written notes on when damage was discovered
How Long Does Storm Damage Repair Take?
Storm damage repair typically takes two to eight weeks from claim approval to completion, depending on damage severity and material availability. Emergency stabilization happens within days; full reconstruction can stretch longer if permits or specialty materials are involved.
| Phase | Typical Duration | What Happens |
|---|---|---|
| Emergency stabilization | 1-3 days | Tarping, board-up, water extraction |
| Damage assessment | 3-10 days | Inspection, adjuster visit, scope agreement |
| Structural drying | 3-5 days | Dehumidification, moisture mapping |
| Reconstruction | 2-6 weeks | Roofing, siding, interior repairs |
| Final inspection | 1-2 days | Walkthrough, punch list, sign-off |
DIY vs. Professional Thresholds
Some storm damage is safe to handle yourself; most is not. The dividing line is whether the work touches structural integrity, electrical or gas systems, anything above ground level, or anything that will be inspected, warranted, or claimed on insurance. Getting this wrong is how a small repair becomes a denied claim.
The Four Questions That Decide It
Before you pick up a tool, answer these four questions honestly:
- Does this affect the structure or the building envelope? Roof, siding, windows, doors, and foundation are the envelope. Breach it and water gets in. Leave it to a licensed professional.
- Does it touch electrical, gas, plumbing, or HVAC? Even a small job near a panel, a gas line, or a supply line carries real risk. Licensed trades only.
- Is it above ground level? Falls are the leading cause of serious injury in home repair. If it requires a ladder above the first story, or any roof access, it is not a homeowner job.
- Will it be claimed, warranted, or inspected? If the work is part of an insurance claim, or if a manufacturer’s warranty covers the material, DIY work can void the coverage or give the insurer a reason to reduce the payout.
Safe for Most Homeowners
These tasks are low-risk with the right protective gear:
- Clearing small debris from yards, driveways, and walkways
- Photographing and inventorying damage for the claim record
- Removing water from a flat surface with a wet vacuum, before it reaches wall cavities
- Minor cosmetic touch-ups below eye level, such as patching small drywall dents or repainting a scuffed interior wall
- Placing buckets and towels to catch active drips while you wait for a pro
Stop if you are unsure, a five-minute call to a contractor costs nothing.
Call a Professional
These tasks carry safety, warranty, or claim risk that outweighs any savings:
- Anything on the roof, including tarping. Roof pitch, compromised decking, and hidden soft spots make this the single most dangerous DIY category after a storm.
- Water extraction and structural drying. Standing water and saturated materials need moisture mapping and commercial dehumidification. A shop fan and an open window will not dry a wall cavity, and trapped moisture becomes mold within days.
- Foundation cracks or signs of settling. Hairline cracks may be cosmetic; stair-step cracks, horizontal cracks, and doors that suddenly stick are not. These need a structural evaluation.
- Electrical, plumbing, or HVAC damage. Water and electricity do not mix, and gas appliances that have been submerged or shifted need a licensed technician before they are used again.
- Mold remediation. Disturbing mold without containment spreads spores through the house. This is a containment and air-filtration job, not a scrubbing job.
- Any repair that is part of an open insurance claim. Let the contractor document and perform the work so the scope and the invoice line up.
The Hidden Costs of Getting It Wrong
DIY savings are real, but so are the consequences of a misjudged repair:
- Voided warranties. Most roofing and siding manufacturers require installation by a licensed or certified installer. Self-installed material can lose its warranty entirely.
- Claim complications. If you perform work that is later part of a claim, the insurer may question the scope, the cost, or whether the damage was pre-existing. Undocumented DIY work is the easiest thing for an adjuster to dispute.
- Compounding damage. A tarp installed incorrectly can flap and abrade shingles, or channel water into a wall instead of away from it. A small leak left for a week can rot framing and insulation that would have been fine.
- Resale friction. Buyers and their inspectors ask for permits and proof of professional repair. Unpermitted structural or electrical work can stall a sale or force a price reduction.
Use the four-question test as a hard gate, not a suggestion. If the work touches the envelope, a licensed trade, a ladder, or an open claim, hire a professional. The money you save doing it yourself is small compared to the cost of a denied claim, a voided warranty, or an injury.
How to Vet a Storm Repair Professional
If the four-question test sends you to a contractor, choose carefully. After a major storm, out-of-area crews arrive and disappear. A few checks separate the legitimate operators from the rest:
- Confirm a state or local license where one is required for the trade, and verify it directly with the issuing authority.
- Ask for a certificate of insurance for both general liability and workers’ compensation, and call the insurer to confirm it is current.
- Get a written scope and a written payment schedule. Be wary of large upfront deposits and of anyone who pressures you to sign the same day.
- Ask whether the company will be on site for the final inspection and whether it offers a workmanship warranty in writing.
- Never sign a contract that assigns your insurance claim rights to the contractor without understanding what you are giving up.
Post-Repair Maintenance Checklist
Maintenance after repairs protects the investment and catches small issues before they become claims. Schedule a walkthrough at 30 days and again after the first heavy rain.
- Inspect roof flashing and shingle edges for lifting
- Check gutters for proper drainage and secure attachment
- Look for new water stains on ceilings and walls
- Confirm caulking and seals around windows and doors
- Clear debris from roof valleys and downspouts
- Photograph the completed work for your records
Conclusion: Choosing the Right Storm Damage Repair Partner
Storm damage repair rewards homeowners who act fast and document everything, but it also rewards choosing the right partner. StormPros is a family-owned general contractor with over 20 years of combined experience in roofing, siding, gutters, and full storm restoration. As dedicated insurance claim specialists, the team simplifies the claim process, restores properties to exceed pre-damage condition, and protects your home’s foundation and structure.
Frequently Asked Questions
How long does it take to repair storm damage?
Timelines vary by severity. Emergency stabilization like tarping or board-up happens within 24 to 48 hours. Water extraction and structural drying typically take 3 to 5 days. Full reconstruction, including roofing, siding, and interior work, usually runs 2 to 8 weeks depending on material availability, permit timelines, and the scope of the insurance claim.
How do storm damage insurance claims work?
You file a claim with your homeowners insurer, who assigns an adjuster to assess the damage. The adjuster compares findings to your policy and issues an estimate. You can hire a contractor to document the damage independently and negotiate if the initial estimate falls short. Most policies require prompt filing, so report damage as soon as it is safe.
What are the first steps to take after discovering storm damage?
Document everything with photos and video before moving anything. Then contact your insurance company to open a claim. Next, arrange emergency stabilization such as tarping or board-up to prevent further damage. Finally, get a professional inspection to catch hidden issues like water seepage or foundation cracks that may not be visible to an untrained eye.
What should I look for when hiring a storm damage contractor?
Verify licensing, insurance, and local references. Ask for a written warranty and a clear scope of work. Avoid contractors who demand full payment upfront or pressure you to sign immediately. A reputable company will inspect thoroughly, explain the insurance claim process, and provide a detailed estimate before any work begins.
Does my homeowners insurance cover all types of storm damage?
Most policies cover wind damage, hail damage, and sudden water intrusion from storms. Flood damage typically requires a separate policy through the National Flood Insurance Program. Wear and tear, poor maintenance, and gradual deterioration are usually excluded. Review your policy or ask your agent to clarify what is covered before storm season.
How long after a storm can I file an insurance claim?
Most insurers require you to file within a reasonable time, often 30 to 60 days from the date of loss, though some policies allow up to one year. Waiting too long can lead to denial. File as soon as you notice damage, even if you are still gathering estimates, to protect your claim rights.


